Building and Deploying GlobalSight
Contents
Building and Deploying GlobalSight
Required Software
You will need to install:
- The ant build tool: http://ant.apache.org/
- MySQL 5.1 (for running GlobalSight)
Building and deploying the system
The GlobalSight system uses the Ant tool to build and deploy the whole project. The main build file is under main6/tools/build/.
Before running the script to build the project, edit the system environment as follows:
- On Windows
- Select My Computer->Property->Advanced->Environment Variables
- Find the Variable Name ANT_OPTS
- Enter the value -Xmx256m
- On Linux
- Set the ANT_OPTS environment variable as above. Syntax depends on your shell, but export ANT_OPTS=-Xmx256m is a good bet.
The build.xml contains several targets. The most important is dist, which:
- Runs the javacc command to generate some special code
- Makes new directories for building and deploying
- Compiles all Java files
- Generate zips with the necessary resources
The project is deployed in the dist sub-folder in the build folder. The core GlobalSight project zip file should be named GlobalSight_$versionID_$Date.
Open a command window and forward to the main6/tools/build directory. Run the ant script to build GlobalSight as follows:
To build a project after the first time, run the clean target before distributing the new project version. This target removes all files generated by the last build to make sure that the new build and deploy uses the latest files and resources.
Using the following script to build and deploy project is both safe and useful to do at any time:
Installing
The first time you build GlobalSight, you will want to run the installer in order to generate the configuration files and set up the DB and LDAP. If you do not have MySQL or OpenLDAP installed, you should install them now.
When you are ready to run the installer,
- Navigate to globalsight/main6/tools/build/dist/GlobalSight/install
- Run Install.bat (if you are on windows) or Install.sh (if you are on Linux)
- Follow the install procedure normally. Refer to the Installation Guide for specific instructions.
Running
Now you're ready to run GlobalSight. If you checked the "Create the GlobalSight Service" box in the installer, you can run it as a service, but for development I prefer to start and stop it by hand:
- Naviagate to globalsight/main6/tools/build/dist/jboss
- Run startJboss.cmd (on Windows) or startJboss.sh (on Linux).
This will start GlobalSight running in the console window. To stop GlobalSight, you can close the console, type Control-C, etc.
Patching the system
To modify code and see it in a running system, you can make a patch for it as follows:
- Compile the new project
- Find out all the modified classes or resources
- Put all of the the new classes or resources in the corresponding directory
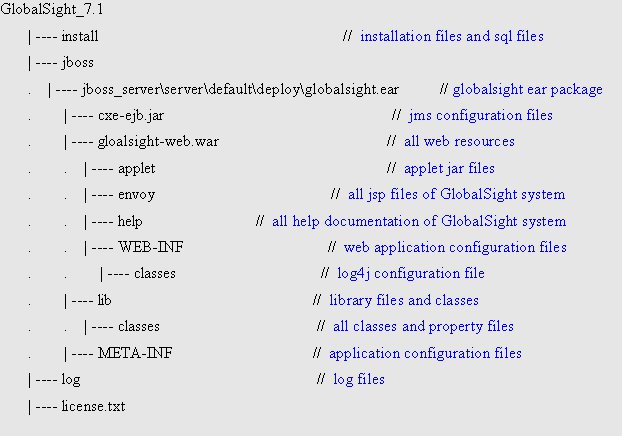
Structure of the GlobalSight system after deployment. You can see this structure when you unzip the build zip file.
When you use ant to build the project, all classes of the GlobalSight system are zipped into the globalsight.jar file. This file is in the library directory.
Directories for the class files are created at the same time in the same library folder, and these are all empty. This makes deploying a patch easier, since you can copy all of the modified classes into the corresponding directories instead of building a new globalsight.jar using the ant script.
The Web container loads the class files from the unpacked directories before globalsight.jar. New classes are then effective only after you restart the container. Other files, such as jsp files and resource files, should be overridden by the new patch files. Some, such as jsp files, are effective immediately. Others, such as message resources, need the container to be restarted.
